Ardour4 初学者教程 03 编辑会话:修订间差异
小无编辑摘要 |
|||
| 第55行: | 第55行: | ||
If the Meter or Tempo of your session changes later in the song or composition, simply add a new marker by right-clicking in the Meter or Tempo timeline and selecting New Tempo or New Meter and entering the new Tempo or Meter in the resulting dialog. | If the Meter or Tempo of your session changes later in the song or composition, simply add a new marker by right-clicking in the Meter or Tempo timeline and selecting New Tempo or New Meter and entering the new Tempo or Meter in the resulting dialog. | ||
= | =使用片段= | ||
[http://brunoruviaro.github.io/ardour4-tutorial/using-ranges/ (原文)] | [http://brunoruviaro.github.io/ardour4-tutorial/using-ranges/ (原文)] | ||
| 第92行: | 第92行: | ||
http://brunoruviaro.github.io/ardour4-tutorial/images/Ardour4_Range_One_Bar_Loop_Solo.png | http://brunoruviaro.github.io/ardour4-tutorial/images/Ardour4_Range_One_Bar_Loop_Solo.png | ||
= | =片段常用操作= | ||
[http://brunoruviaro.github.io/ardour4-tutorial/working-with-regions/ (原文)] | [http://brunoruviaro.github.io/ardour4-tutorial/working-with-regions/ (原文)] | ||
| 第243行: | 第243行: | ||
http://brunoruviaro.github.io/ardour4-tutorial/images/Ardour4_Beat.png | http://brunoruviaro.github.io/ardour4-tutorial/images/Ardour4_Beat.png | ||
= | =片段进阶操作= | ||
[http://brunoruviaro.github.io/ardour4-tutorial/further-region-operations/ (原文)] | [http://brunoruviaro.github.io/ardour4-tutorial/further-region-operations/ (原文)] | ||
| 第449行: | 第449行: | ||
The single duplicate action with “Control” + Click on the region + Drag a copy. | The single duplicate action with “Control” + Click on the region + Drag a copy. | ||
=伸展/ | =伸展/收缩片段= | ||
[http://brunoruviaro.github.io/ardour4-tutorial/stretching-shrinking-regions/ (原文)] | [http://brunoruviaro.github.io/ardour4-tutorial/stretching-shrinking-regions/ (原文)] | ||
=<center>— [[Ardour完全教程|返回主目录]] —</center>= | =<center>— [[Ardour完全教程|返回主目录]] —</center>= | ||
2015年10月28日 (三) 20:32的版本
安排音轨
In the following chapters we will use Ardour to create a short rhythmic passage using several drumkit samples.
We will continue working on this passage in later tutorials, such as Working with Regions and Creating Looped Sections. We assume that you have read the chapters in the Getting Started section already, and are familiar with Importing Audio, Tracks, and the Timeline.
Importing Samples
The first step is to add some sounds, which is discussed at length in the Importing Audio chapter. Here, we are using the Add existing media dialog (“Ctrl” + “I”) to import some drumkit samples as regions. The samples used in this tutorial were obtained from a sample pack from the freesound.org website. You can download samples from freesound.org by going to the website itself, but Ardour also has a handy Search Freesound feature built into the import window. From there, you can search and download Freesound.org samples directly.
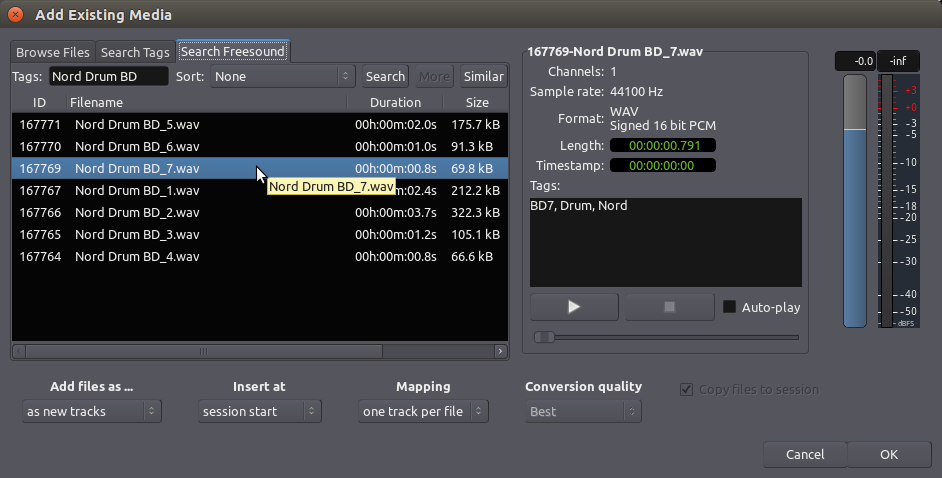
In the screenshot above, we searched for “Nord Drum BD” using the Search Freesound feature of Ardour. Note that we specify that the audio file should be added “as new tracks” and inserted “at session start” (menu options at the lower left). The drumkit sample will appear as new individual track in the Editor Window, each with the name of the audio file used.
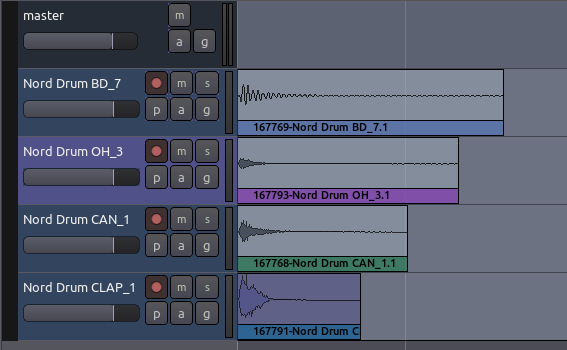
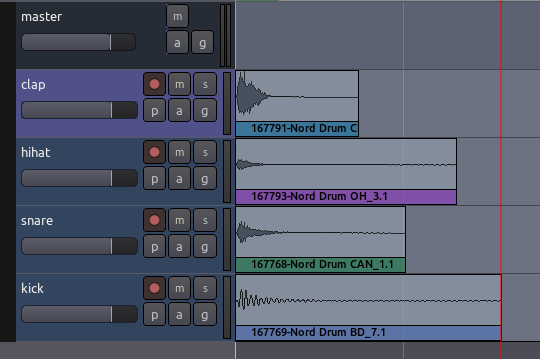
After importing a few more sounds (one snare, one hi-hat, and one clap), our session looks like this (track names come from the original sample name from freesound.org):
Organizing the Tracks
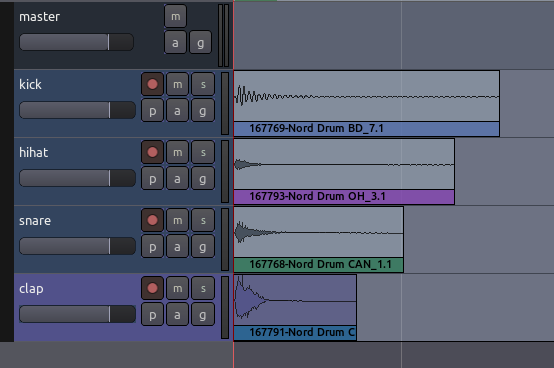
Now we rename the tracks so we can quickly see the location of each instrument (double-click on the track name to edit it).
You may also wish to rearrange the order of the tracks from top to bottom in the editor window. Do that by clicking the Tracks & Busses tab at the far right of the Editor Window and drag-and-dropping the tracks in the order you want.
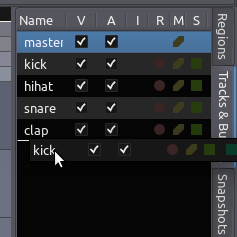
Tip: you can also use the V check boxes in this tab to view or hide Tracks in the Main Canvas.
Here we have ordered the drumkit so that the kick drum is on the bottom, the snare and high hat are in the middle, and the clap is on top.
设置韵律
The Meter determines the musical speed of the passage we are composing, as measured in Beats Per Minute.
If we are composing something which is rhythmic, it will also determine the lengths of the sound samples we use to some extent. So it is important to be able to set up the Meter before we continue.
To see the meter-related timelines for our session, we can right-click anywhere in the “header” of the Rulers and check the following options: Meter, Bars & Beats, and Tempo.
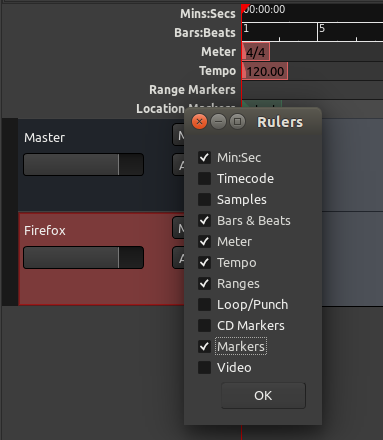
It is possible to set a Meter and Tempo for the entire Ardour session, as well as to change them at different points in the same session. In order to do this, locate the Meter section of the Timeline Bar in the Editor Window, and right-click on the first small red mark to open the Meter Dialog.
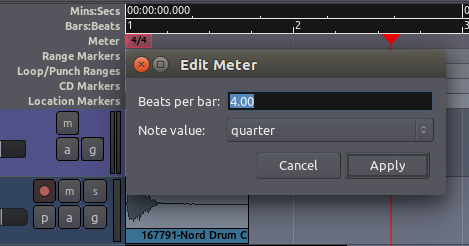
Here you can enter new values for the Beats Per Bar as well as the Note Value. Click “Apply” to apply the changes globally to your session.
Then, locate the first red mark in the Tempo section, right-click on it, and choose the BPM (Beats Per Minute) for your session.
If the Meter or Tempo of your session changes later in the song or composition, simply add a new marker by right-clicking in the Meter or Tempo timeline and selecting New Tempo or New Meter and entering the new Tempo or Meter in the resulting dialog.
使用片段
A Range is a selection of the Timeline that can include one or more Tracks.
The Range tool (shortcut “R”) is located just below the Transport Menu in the Edit Window.

When you have selected the Range tool, your mouse pointer will look like a vertical line.
It can be useful to create Range selections that align with the edges of regions on your Timeline. Selecting the “Grid” and “Region bounds” items for Grid and Grid Point menus respectively makes this easy.

To make a Range selection, drag anywhere on the Timeline. The current Grid and Grid Point options determine exactly how the Range selection behaves. Once a Range has been selected, Right-Clicking on it opens a menu with Range-specific operations.
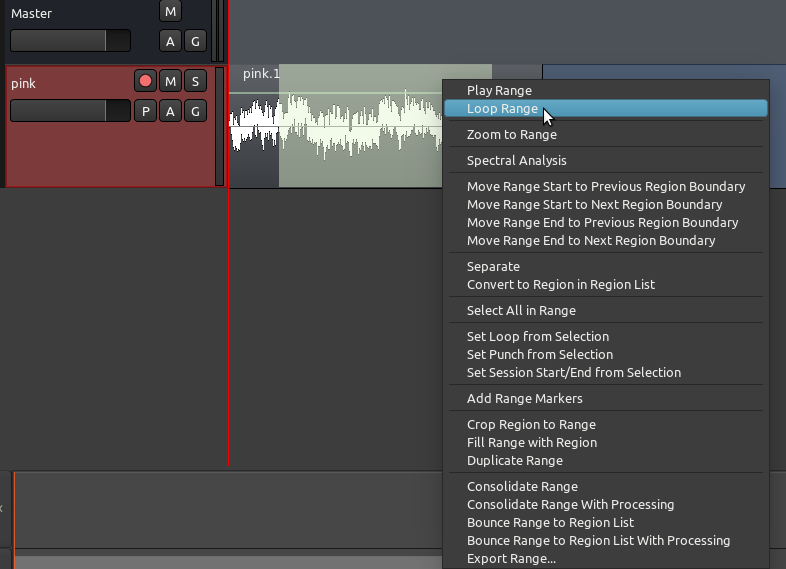
Loop range, for example, sets up Loop Markers around the current Range and begins looped playback. The Loop Start and Loop End points can be changed by moving the green triangles which correspond to the each point.
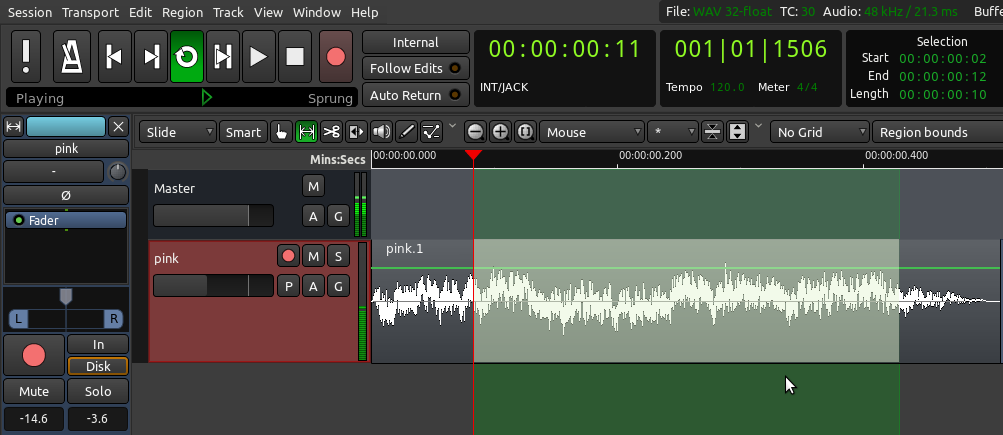
Other useful options here for editing allow you to Duplicate the Range, Select All within the Range or Crop the Range.
Setting Up a Loop
Returning to our rhythmic passage example, we will want to hear the passage we are composing, perhaps as a loop, while we are moving the samples around. To do that, we must create a Range to listen to within our session, so that we can return to exactly this point in the Session again and again.
Zoom out if needed (shortcut “-”) to see full bars in the timeline. Use the Range tool to select an entire bar with the help of the Grid settings, and right-click inside that range to “Set loop from selection”. You will probably want to set the Grid so that your actions snap to certain metric elements of the session (for example, snapping to Beats). Once the one-bar loop has been set up, the screen will look like this:
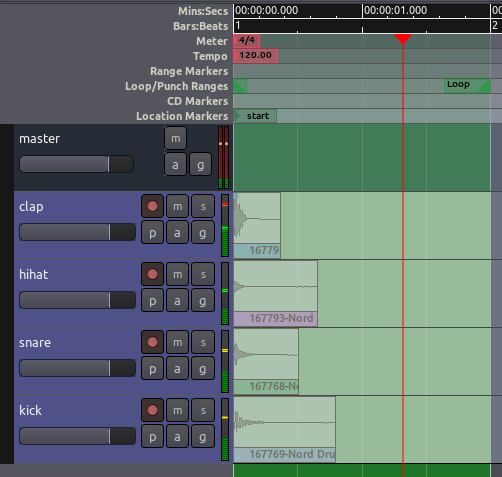
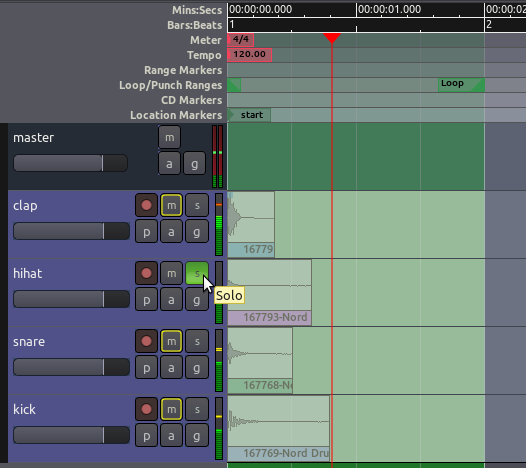
This will set up a loop range which you can play by using the Play Loop button in the Transport Menu at the very top of the Editor Window (shortcut: “L”). While the Range is looping, you can use the Solo button on each track to listen to each the instruments individually.
片段常用操作
Sections of audio are called Regions in Ardour.
To compose the short rhythmic passage we’ve been working on, we will need to know how to Select, Move, Split and Trim these Regions, as well as how to Fade In or Fade Out their volume and create Crossfades between them. Some of these options may need to happen at specific Edit Points in the composition, or according to the musical Meter we can define with the Timeline and the Grid as well.
Selecting Regions
The Grab Mode (shortcut “G”) is the tool to select and move objects. It is located just below the Transport Menu in the Editor Window (the little “hand” icon). You will use this tool a lot in your Ardour work.

When it is active, your mouse pointer will look like a little hand icon.
Try all of the operations below, for practice:
Click on the Waveform of the region to select it. Click and drag on a region to move it around (left and right within the same track, but also up and down onto other tracks).
Use “Control” + “Click” to create and drag around a copy of the region.
You can select multiple regions by holding the “Shift” key while selecting.
Move multiple regions at the same time after selecting them.
   You can select several sequential regions on one track all at once by holding down the “Shift” key while selecting the first and the last Regions of the sequence (copy a few regions on the same track to try this out).
   When you select a single Region, make sure to click on the Waveform section of its rectangle. The lower stripe with the Region name is used for a different action (see Trimming Regions below).
   Use the “Del” key to delete selected regions.
   Standard copy (“Control” + “C”), cut (“Control” + “X”), and paste (“Control” + “V”) operations also work with regions.
   You can also drag a selection box over multiple Regions to select them all.
Moving Regions
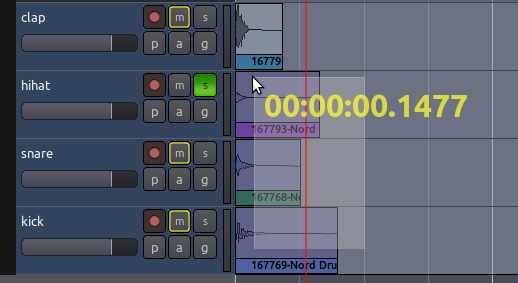
While moving a Region, a Timecode will appear on the screen in yellow numbers. This Timecode is the Region’s starting point on the Timeline. The unit of this timecode is the same as the unit of the Second Clock, which you can change by right-clicking on the Second Clock and choosing a new unit (Minutes:Seconds, Bar:Beats, etc).
You can move Regions horizontally (sideways) to a different point in time on the same Track, or you can move the selected Region vertically (up or down) to a different Track.
When a set of one or more Regions is selected, you can move the whole set by dragging with the mouse.
Note: make sure to select the Region in its waveform section, because selecting the bottom title bar area is used for a different action (see Trimming Regions below).
Duplicating Regions
In addition to “Control” + “Click” + drag and standard copy/paste, Ardour offers other handy ways to duplicate regions. Use the Select/Move Objects tool to select one or more Regions, and use the Duplicate function to make one or more copies (menu Regions > Duplicate). Three options are available:
   Duplicate (shortcut “Alt” + “D”): make a copy of the selected region on the same track, immediately after the original.
   Multi-Duplicate (shortcut “Shift” + “D”): make multiple copies of the selected region at once (same track, in sequence). You can specify the number of duplications.
   Fill Track: make as many copies of the selected region as needed to fill the entire track, all the way up to the End marker on the timeline.
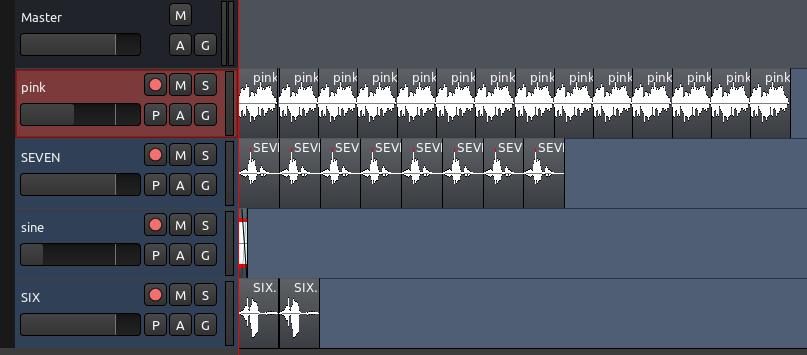
In the following screenshot, regions have been duplicated using the methods above.
Using Edit Points
When you use the standard copy/cut/paste commands, where exactly will the regions be pasted? The exact location is determined by the Edit Point drop-down menu.
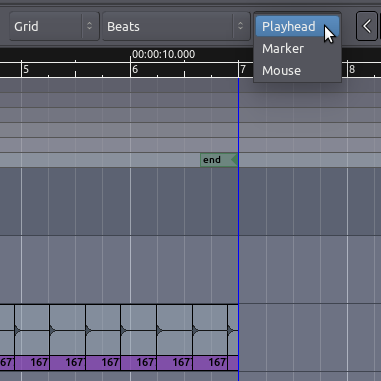
If Mouse is selected as the Edit Point, the copied Region will be pasted at the current position of the mouse.
If Playhead is selected as the Edit Point, the copied Region will be pasted at red Playhead line on the same Track where the original Region is.
Finally, if Marker is selected as the Edit Point, then the copied Region will be pasted immediately after the currently selected Location Marker.
Markers
It is very useful to be able to tag different locations in a session for later use when editing and mixing. Ardour supports several ways for doing this. The most common method is using Location Markers, which define specific positions in time.
Location Markers can be added to the Timeline by right-clicking on the Location Markers strip and selecting Add New Location Marker. If you don’t see the Location Markers strip, right-click on the timeline and select it to make it visible. Location Markers can also be selected with the mouse and moved to new positions. Right-clicking on a location marker lets you rename the marker, among other options.

TIP: when you first create a new session, two location markers are automatically added by default. These are the start and end markers that you see in the screenshot above. If you don’t see the end marker, zoom out enough and you will find it.
Splitting Regions
To Split a Region simply means to divide a single Region into two independent Regions. There are two ways of accomplishing this:
   You can use the Cut Mode (shortcut “C”) to point and click anywhere you want to split; or
   You can stay in Grab Mode and use the shortcut “S” (for “Split”). In this last case, the point at which a Region will be split depends on the currently selected Edit Point. If Mouse is selected as your current Edit Point, select a Region and place the cursor at the point you would like to Split, then type “S” (same as going to menu Edit > Split Region).
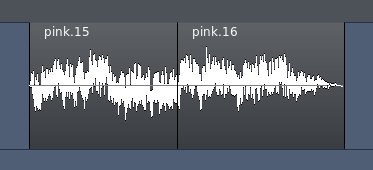
After being split, the original single Region becomes two independent Regions, with a new name for each, as in the image above. The two new Regions are now entirely independent. You can move and edit them separately.
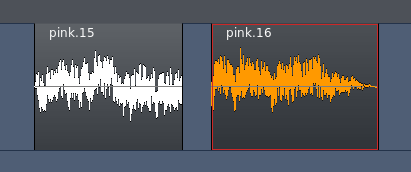
Regions can also be split by using the Playhead or a Marker as the Edit Point.
Trimming Regions
If you move the cursor near the left or right side edge a Region, you will see that the pointer becomes an arrow. Click and drag inwards from either end of the Region, and the Region will be shortened accordingly. This is called Trimming the Region. Regions can be trimmed from the start of the Region (drag from left to right at the edge) or from the end (drag from right to left).
This action is non-destructive: no audio is actually being deleted. It is as if you were just “hiding” those portions of the Region that you don’t want or don’t need anymore. Later on, you can “un-trim” the Region (i.e., extend it back to its original full size), even if it has been moved or copied to a new Track. A trimmed Region will receive a name derived from the original name of its parent Region, and you will see this reflected in your Region List. For example, in the images above, a single original region named sample_01 has its trimmed versions named as sample_01.1, sample_01.2, (…) sample_01.15, and so forth.

TIP: Trimming will obey Grid settings. If you don’t want your trimming to be constrained to any grid, simply turn the grid off (No Grid).
Deleted Regions
Because Ardour is non-destructive, the Regions you have deleted from tracks are not completely removed from the Session. They can always be accessed again from the Region List on the far right side of the Editor Window (Regions can be dragged from the list onto any tracks).
Creating Fades in Regions
A Fade is a change in the volume of a Region, either as the Region starts or as it ends. A Fade at the start of the Region is a Fade In, and at the end of a Region it is a Fade Out. Each Region has two small handles along the top corners, which can be dragged inwards from either edge to create a Fade In or Fade Out. The screenshot below shows a Fade In (indicated by the shaded blue area).
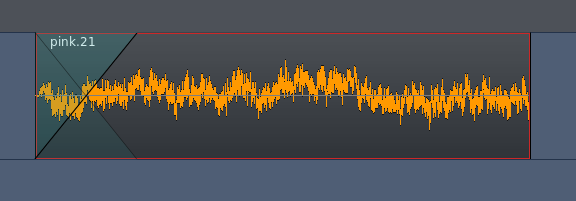
In fact, every Region has a Fade In and Fade Out built-in. By default, the region fade is very short, and serves to avoid clicks in the transitions at the start and end of the region. By adjusting the regions fade length as shown above, a more gradual transition can be accomplished.
By right-clicking on one of the Fade (the shaded blue area), the speed of the Fade can also be adjusted.
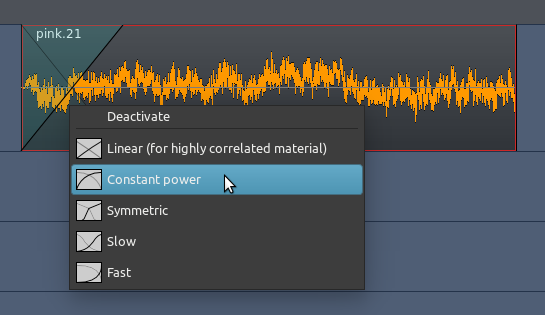
Crossfading Between Two Regions
When one Region Fades Out while another Fades In, this is called a Crossfade. If the two Regions are in different Tracks, you can use the method described above with the Fade In and Fade Out handles. The following screenshot shows an example.
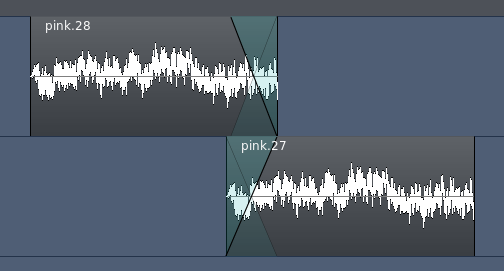
However, if both Regions are in the same Track, you need to overlap them in order to create a crossfade. When regions overlap on the same track, Ardour treats them as layers, that is, one of the regions is considered to be on top of the other. The important rule to understand is:
The Fade In (or Fade Out) of the topmost region represents the crossfade between the two regions.
Once you understand this principle, it’s easy to create and control crossfades between regions. Here’s an example. The two separate regions seen below will be made to overlap in order to create a crossfade.

Note that we did not add any extra Fade Out to the first region, but we did add a longer Fade In to the second region. Then we drag the second region partly on top of the first:
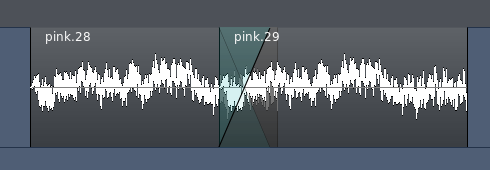
The Fade In of the second region works now as the crossfade between the two regions. In other words, the first region will fade out in a mirror image way as the second region fades in.
In order for this to work, though, we need to make sure that the region that has the desired fade is on top in Ardour’s layering system. In order to change layering of regions, select a region and go to the menu Region > Layering.
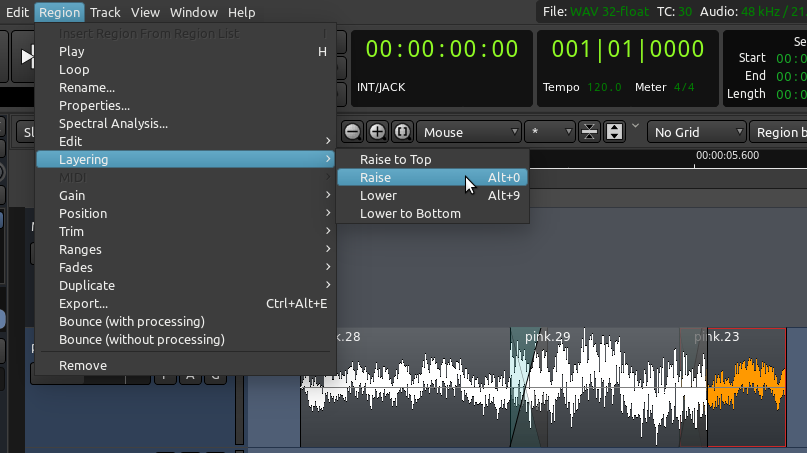
The difference may be hard to hear if you are doing this with the very short percussive sounds we imported earlier. To really hear the effect, import a couple of longer samples to try it out (for example, a sample of rain sounds, and another of a human voice). Overlap several seconds of your long samples on the same track. You will hear the difference as you move the second region to the bottom (“Lower to Bottom”), and then back to top (“Raise to Top”). When it’s on top, we will hear the desired crossfade. When it’s at the bottom, we will hear no crossfade, just an abrupt change from first to second region (assuming your first region has no Fade Out specified, as in the screenshots above).
Using Grid Settings
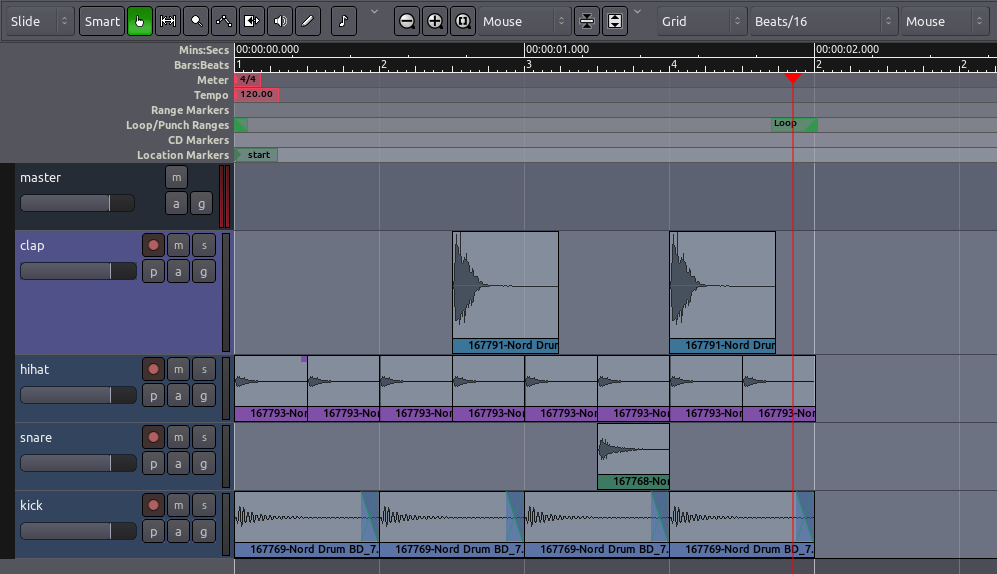
Experiment with the Grid setting, as discussed in the Setting Up the Timeline chapter, to give different kinds of Quantization—in other words, to constrain the boundaries of each Region to certain grid points. Here, the Grid has been activated and set to Beats/16, to quantize the Regions to sixteenth notes within each bar. You may wish to Trim the endpoints of some of the samples, as discussed above, to fit within the metric structure you have set up (for example, the hihat samples in the screen below have been trimmed so that they don’t not overlap with each other).
片段进阶操作
In this section you will learn a few more things you can do with Regions.
Right-clicking a selected Region reveals a context menu. The first item in the menu (labeled with the Region’s name) contains a large sub-menu. All of these operations are also available from Ardour’s main Region menu.
This section describes a few of the most commonly used operations accessible from these menus.
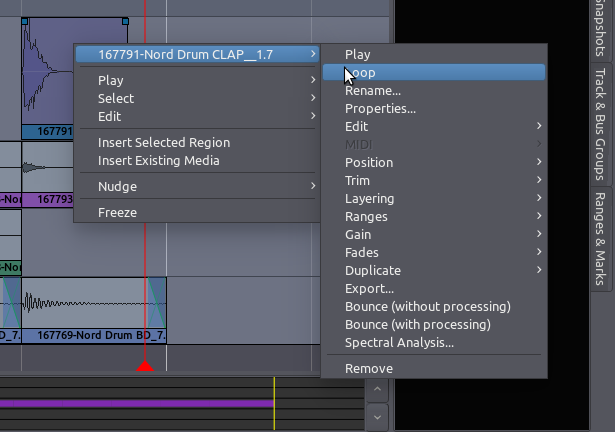
   Play: play back from the beginning to the end of that Region (shortcut “H”).
   Loop: set the loop range to fit that region’s duration, and start looping it right away.
   Rename: change a region’s name.
   Properties: lots of information on the region, plus ability to change its gain.
   Position: among other options, in this sub-menu you will find The Lock toggle box: it locks the Region so that it cannot be Moved or Trimmed. It can still be Split, however, and the resulting Regions will be unlocked.
   Edit: in this sub-menu you find useful tools such as Mute, Pitch Shift and Reverse. Mute renders the region silent. Pitch Shift alters the pitch of a region without changing its duration. Reverse makes the region play backwards.
   Gain: useful options such as Normalize, Boost Gain, and Cut Gain.
   Duplicate: includes Duplicate, Multi-Duplicate, and Fill Track. These were explained in detail in the chapter Working with Regions.
   Spectral Analysis: window displaying the overall frequency content of the Region.
Feel free to explore by yourself other sub-menus not mentioned above. Many of them are mirrors of the options you find under Ardour’s Region menu. Below we go into a bit more details on some of the most useful functions.
Pitch Shifting
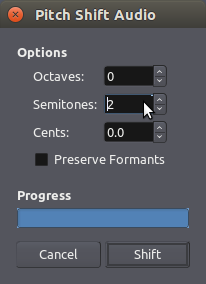
The Pitch Shift function alters the pitch of a region without changing its duration. The function applies a pitch-shifting algorithm to create a new audio clip based on the source clip.
The Pitch Shift window the user to specify the amount and direction of transposition desired. The window includes a Preserve Formants button. When pitch shifting by large amounts, the Preserve Formants option can give results that sound slightly more natural, particularly when used on vocal material.
Normalize
The Normalize function (shortcut “Alt” + “3” non-destructively boosts the level of the selected Region so that the Peaks are at 0 dB or less. When Normalizing to 0.0, the region will be as loud as possible while avoiding Clipping. Sometimes you may find useful to normalize a region to a value less than 0, such as -1.0, -3.0, or -6.0 decibels, so it doesn’t become too loud.
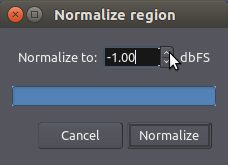
Two other useful gain operations for regions are Boost Gain (“Alt” + “6”), and Cut Gain (“Alt” + “7”). Be sure to try them out.
Reverse
The Reverse function reverses the selected region of audio, in effect causing it to play backwards. Reversing a region creates a new audio file ‘behind the scenes’.
Operations on two or more selected Ranges
If more than one range is selected, the operation will apply to all of them (for example, Normalize, Reverse, etc.)
Combine
Some operations from the context menu will only become available when two or more regions are selected. For example, take a look at the “Combine” function, under the sub-menu “Edit”. First we select two adjacent regions:
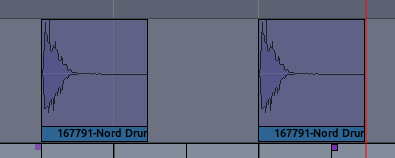
Then we choose “Combine” from the right-click context menu, or from Ardour’s main menu Region > Edit > Combine:
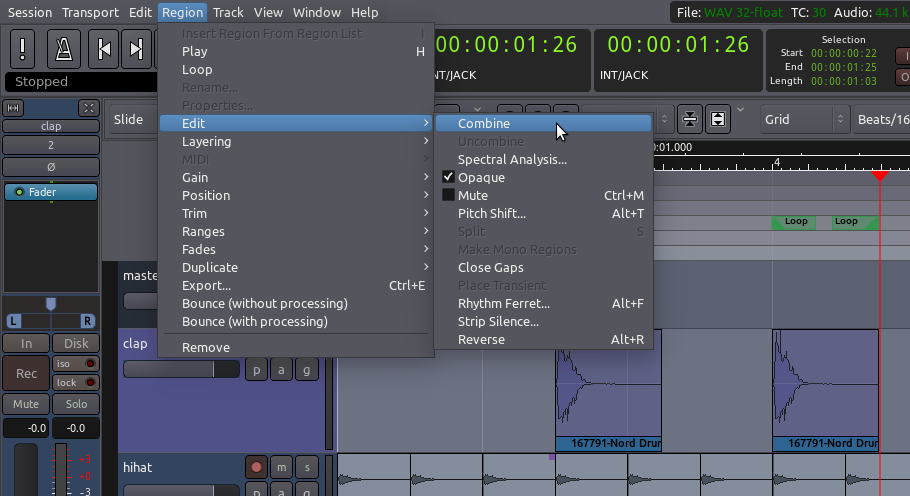
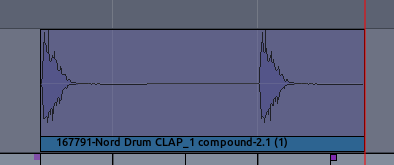
As a result, the selected regions are combined into one. This is particulary useful when you have found an exact sequence of regions that works just as you want, and then you would like to copy and/or move the whole sequence as group.
Notice that the resulting combined region has the word “compound” attached to its name.
改变编辑模式
We have already learned a bit about the Grab Mode (select/move objects) and Range Mode. In this chapter we will get an overview of all the Edit Modes and Cursor Modes available on that part of the Editor Window.
Edit Modes and Cursor Modes

These controls define the behavior of the main canvas and the different functions of the cursor.
The drop-down Edit Mode menu contains three options. Slide Edit is the standard mode, and the one we will be using in this tutorial. It allows you to freely drag regions around horizontally (within the same track) and vertically (between tracks). The other two options limit or block your ability to move regions from their positions, but we will not cover them in detail here.
Grab Mode (shortcut “G”)

This Cursor Mode allows you to select or move objects such as regions and breakpoints (in an automation curve). When this Cursor Mode is selected, your cursor pointer will look like a little hand icon.
Range (shortcut “R”)

This Cursor Mode allows you to click and drag to define or resize Ranges. When this Cursor Mode is selected, your cursor pointer will look like a vertical line.
Cut Mode (shortcut “C”)

Use this Cursor Mode to split Regions into smaller Regions. The cursor turns into the shape of scissors. This allows you to point and click on a Region to split it at the cursor.
TIP: you can cut Regions directly from the Grab Mode too (sometimes this method can be more practical.) Without leaving the Grab Mode, simply place the mouse at the desired location on the Region to be cut, and hit the shortcut “S” (for “split”). Important: your Edit Point (to the right of the Grid settings) must be set to Mouse.
Stretch/Shrink Region (shortcut “T”)

This Cursor Mode allows you to drag and resize the duration of an entire Region without changing the Pitch. This is sometimes called ‘Time stretching’, hence the shortcut “T”. Please see the chapter on Stretching/Shrinking Regions for more details. When this Cursor Mode is selected, your cursor pointer will look like a diagonal arrow.
Audition Mode (listen to specific regions)

This Cursor Mode allows you to click on any existing Region on any track and have it immediately played back. Playback stops at the end of the Region. When this Cursor Mode is selected, your cursor pointer will look like a small loudspeaker icon.
TIP: you can also quickly audition a selected Region without leaving the Grab Mode. Simply select a Region and hit the shortcut key “H”.
Draw Mode (shortcut D)
Use this mode to draw gain automation points. Cursor looks like a pencil. Automation will be discussed in detail in the chapter Using Automation.
You can also edit individual points in this mode if you bring your cursor right on top of the automation point you want to move (mouse will turn into a small cross). However, if you are not precise this may accidentally create a new automation point. If this becomes a problem, you should use the next Mode, which only allows for editing existing points, not creating new ones.

Edit Mode (shortcut E)
Use this mode to edit existing gain automation points. Cursor looks like a hand, and turns into a small cross when you are on top an existing point. Click (hold the click down) and drag in order to move points.

MIDI
The last two buttons explained above are also used to create and edit MIDI information, but we are not covering MIDI in this tutorial.
Horizontal Zoom and view options

The main shortcuts you will probably be using all the time are “-” and “=” (zoom out and zoom in, respectively). Zooming will happen in relation to the Edit Point currently chosen (Mouse, Marker, or Playhead). If in doubt of which Edit Point to choose, try Mouse.
The Zoom to Session button (shortcut “_” - that’s the underscore character) zooms in or out as needed so that you can see the Start and End markers of your project.
All the zoom options discussed above control the amount of horizontal content you will be seeing on screen. Once you have a session with several tracks, you will also want to control the amount of vertical content you are able to fit (see) on the screen. There are several ways to do this:
Use the “Number of visible tracks” drop down menu to select how many tracks you want to fit on your screen.
Use the “Shrink tracks” button to make all selected tracks smaller.
Use the “Expand tracks” button to make all selected tracks larger.
You can also change an individual track size by dragging from its bottom edge, or right clicking on the track header and selecting the desired “Height”.
You can use the navigation tool at the bottom of the Editor window in order to scroll up and down the session, and adjust horizontal and vertical zoom by adjusting the size of the viewing rectangle.

创建循环部分
You can easily repeat sections of audio in your Ardour session.
Here, we take the short rhythmic passage we created in Working with Regions and duplicate it to make a loop.
Before duplicating the passage, it is a good idea to combine individual regions in the same track into a single one: it easier to move them around this way, and it prevents you from accidentally moving a single hihat out of place, for example. There are two ways of doing this: Combine Regions (allows you to “uncombine” later on), and Consolidate Range (“writes it in stone”, does not allow you to separate them later).
If are still planning on making alterations to the rhythm (adding, removing, or moving individual regions), it may be better to use the Combine regions option. If you like the sequence the way it is and don’t want or don’t care to have the ability to separate them later, use Consolidate Range option.
Combine Regions
Simply select all the regions you want to combine:

Then go to menu Region > Edit > Combine (or right-click on the selected regions and find the same option through the context menu, as shown below):
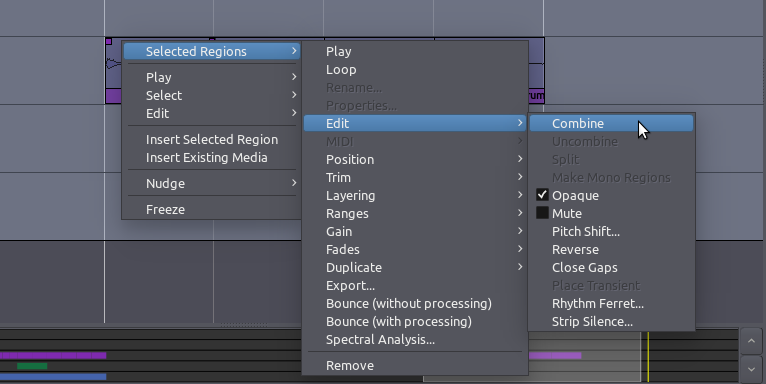
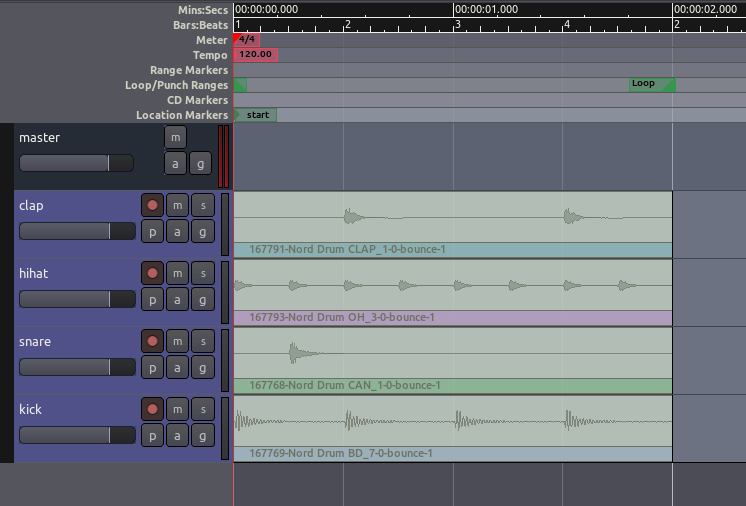
The combined regions will look like this (note the word “compound” appended to the name):

Should you need to separate them again in the future, simply select the compound region and go to the same menu and choose the option “Uncombine”.
Consolidating the Range
A more permanent alternative to Combine is to use Consolidate. When you’ve arranged your Regions into a single “loop cycle” and you’re satisfied with the sound, create a Range with all the regions that will make up the loop. First, make sure every Track used in the loop is selected. Unselected Tracks are gray, and selected ones are blue. If any of the Tracks you used are not selected, hold down the Shift key while clicking on them to add them to the selected group. Finally, use the Range tool to select the entire loop.
Once again, the Grid setting will help you to set the range precisely to the start and end points of your metric bar. Once you have the entire loop selected, Right-Click on the range and select “Consolidate range”. If you would like any Automation or Plugin effects you have added to the loop to be included, select “Consolidate range with processing”.
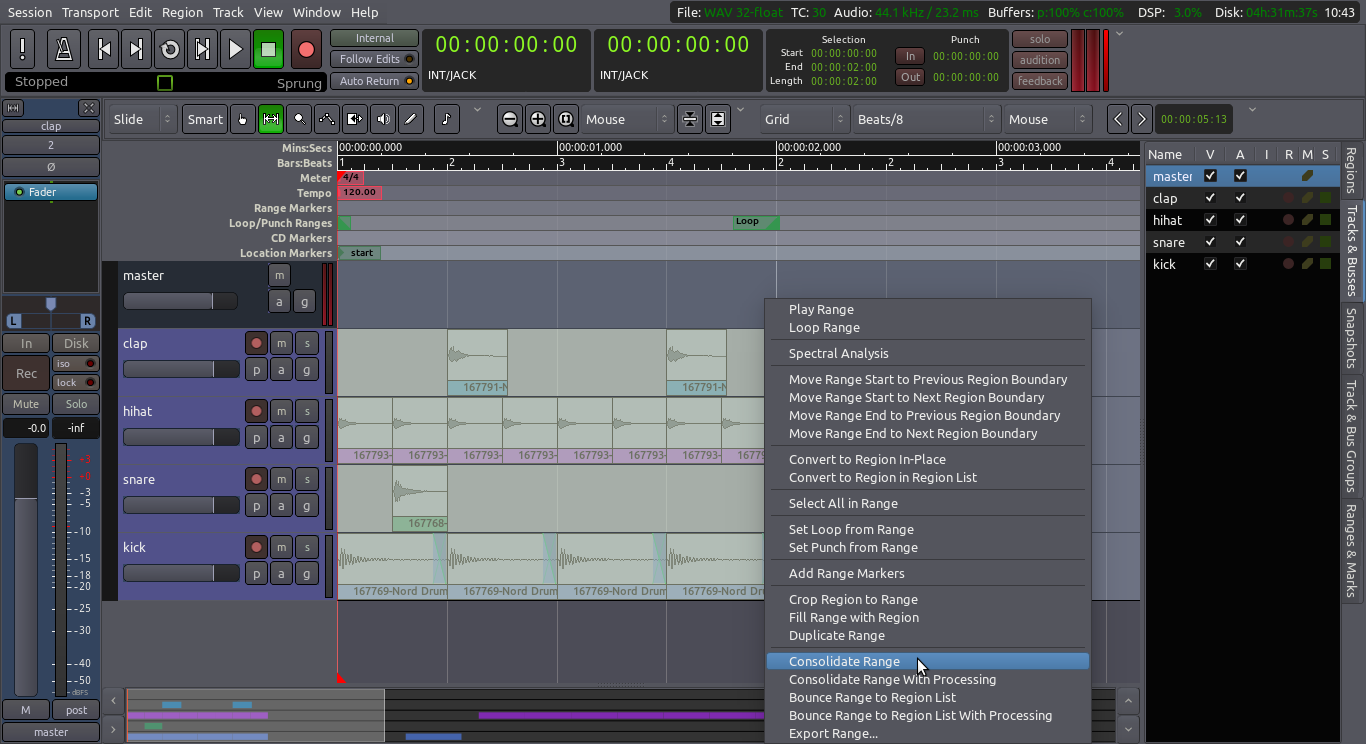
When the range is Consolidated, new Regions will appear in each Track, each containing all the repetitions of the samples which you set up in the previous steps. Remember, once the range is consolidated, there is no way to undo this operation. In any case, if you find that you need to alter the rhythm in any way, you can always retrieve the original individual samples from the Region List and rebuild the pattern with them.
Duplicating the Range
After you have merged individual regions that form your pattern (using either Combine or Consolidate), it’s time to duplicate the pattern to make it loop for several bars.
The Multi-Duplicate feature (seen in the Working with Regions chapter) is a good way to accomplish this. Go back to Grab mode (shortcut “G”), select all regions, and hit “Shift” + “D”. Choose how many times you want to duplicate the pattern (for example, 16). After duplication our session looks something like this:
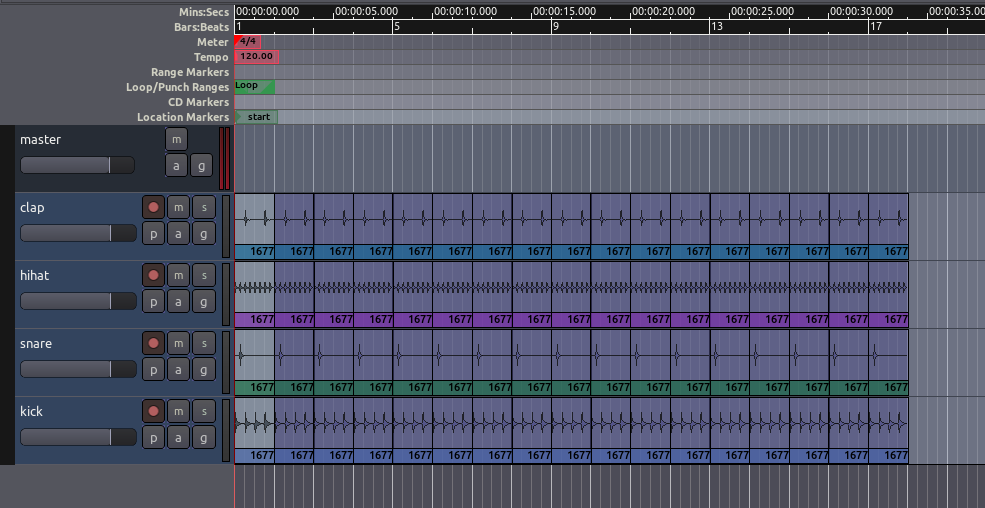
Just for review, other options you could have used for duplication are:
The Fill Track command from menu Region > Duplicate > Fill Track. This would fill the entire track with copies of the selected regions, all the way up to the End Marker.
The single Duplicate command from the same menu (shortcut “Alt” + “D”). This lets you make a single copy at a time.
The single duplicate action with “Control” + Click on the region + Drag a copy.