UbuntuHelp:MythTV/Install/Server/Base/Backend
来自Ubuntu中文
| 点击翻译: |
English |
请不要直接编辑翻译本页,本页将定期与来源同步。 |
Install the base system
After downloading and burning the CD for your system , boot the CD up and start the installation.
- Insert your Ubuntu Alternate Install Disk
It is recommended you test the CD for errors before installing, to eliminate a bad installation during troubleshooting later.
 |
Choose Install a command-line system |
 |
Choose your Language |
 |
Choose your Country |
 |
Choose Yes if you need a non-english keyboard>>otherwise;>>Choose No and select your keyboard layout and style from the list |
 |
Enter the host name for the system |
Partitioning Note: This guide assumes installation to an entire drive in a system that does not require advanced partitioning. Installations of such nature are beyond the scope of this guide and you are advised to do your research before attempting advanced partitioning if you do not know what you are doing.
 |
Choose Partitioning method: Manual |
 |
If you are installing to an empty drive (as shown), select Free Space and press Enter |
| If you are installing on top of existing data- which will erase all existing data on the drive, select the entire drive and press Enter, answer Yes to the warning, and then select Free Space | |
 |
Select Create a new partition |
 |
This partition will be for the OS. It should be approximately 5-10GB in size. |
 |
For Type, Choose Primary- all partitions you will be setting up will be Primary partitions |
 |
For Location, Choose Beginning- all partitions you will be setting up will start at the beginning |
 |
Make sure / is the mount point and choose Done setting up the partition |
 |
You will be provided with a summary screen, it should be similar to this. |
| Select Free Space and press Enter | |
| |
Select Create a new partition |
 |
This partition will be used for Linux Swap and should be approximately 1.5-2 times the size of your system RAM. This example shows a swap area of 2GB. |
| The type will be Primary and the location Beginning | |
 |
On the summary screen, select Use as: and press Enter to bring up this screen. |
| Select swap area and press Enter | |
 |
and then Done setting up the partition |
 |
You will be provided with a summary screen, it should be similar to this. |
| Select Free Space and press Enter | |
| |
Select Create a new partition |
 |
This partition will be for your media storage and will take the rest of the available space on your drive. Press Enter. |
| The type is Primary | |
 |
On the summary screen, select Use as: and press Enter to bring up this screen. |
| Select XFS journaling file system and press Enter | |
 |
Select Mount Point: and press Enter to bring up this screen. |
| Select Enter manually and press Enter | |
 |
Enter /var/lib, press Enter and select Done setting up the partition |
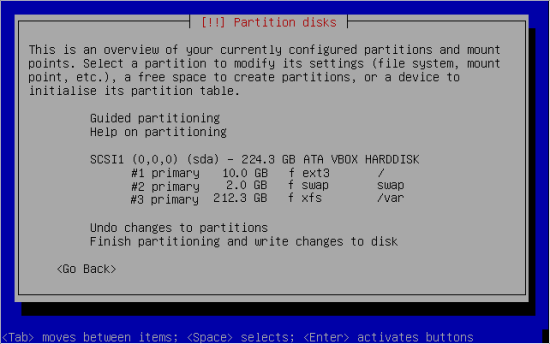 |
The final summary screen will be shown. After double-checking the partitions, select Finish partitioning and write changes to disk |
- A warning screen will appear, alerting you to the changes to be applied. Select Yes to partition your disk now.
 |
Choose your Time Zone |
 |
Select Yes to set your system clock to UTC |
 |
Choose a Username |
 |
Choose a password |
- The Base System will begin to install... kick back, this may take a little while.
 |
When Prompted, follow the directions to reboot |
- And then log in with the user name and password you just set up