“Ardour4 初学者教程 07 附录”的版本间的差异
来自Ubuntu中文
(→术语表) |
(→— 返回主目录 —) |
||
| (未显示同一用户的14个中间版本) | |||
| 第1行: | 第1行: | ||
=进一步的帮助= | =进一步的帮助= | ||
[http://brunoruviaro.github.io/ardour4-tutorial/further-help/ (原文)] | [http://brunoruviaro.github.io/ardour4-tutorial/further-help/ (原文)] | ||
| − | |||
| − | |||
| − | + | 除了在链接章中列出的网址,还有一些在互联网上的资源可以帮助您学习Ardour,以及帮助您修复一些有可能遇到的问题。 | |
| − | + | '''Ardour手册''' | |
| − | + | 官方的Ardour手册是主要的Ardour参考书,它目前仍在编写中,这意味着您(还)不能找到每一个功能的解释。但它已经是一个很了不起的资源: | |
| − | + | http://manual.ardour.org/ | |
| − | + | '''通过聊天软件得到帮助''' | |
| − | + | 在学习Ardour和使用Ardour工作时,有一个获得技术支持的好方法,就是使用'''“聊天Chat”'''功能。Ardour内置有一个“聊天”选项,可以在主菜单下找到“帮助Help > 聊天Chat”,然后(通过您的网页浏览器)连接到位于Freenode网站上的Ardour IRC频道。 | |
| − | + | 您也可以使用你具备有IRC功能的聊天应用程序(例如Pidgin或者Xchat)连接到在Freenode网站上的Ardour频道(#ardour或者#ardour-osx),或者直接使用这个连接: | |
| − | + | http://webchat.freenode.net/?channels=ardour | |
| − | + | 输入昵称然后连接,欢迎您! | |
| − | + | 在这样一个IRC聊天频道或房间,您可以找到热情开发人员和其他用户,一起讨论Ardour的使用、您遇到的问题和/或故障,或者您想讨论的关于Ardour的建议 。 | |
| − | + | '''通过电子邮件列表得到帮助''' | |
| − | + | 对于那些宁愿使用电子邮件列表而不是IRC聊天的朋友,Ardour用户电子邮件列表也是一个好地方,用户和开发者可以讨论任何关于使用Ardour的问题和想法。这是一个活跃的列表,有许多乐于助人的且知识渊博的用户来帮助指导经验较少的人。有时有更常见的讨论话题会类似如:记录技术、音频接口的选择等。 | |
| − | + | http://lists.ardour.org/listinfo.cgi/ardour-users-ardour.org | |
| − | + | '''Ardour 相关网站''' | |
| + | * http://ardour.org | ||
| + | * http://community.ardour.org/community | ||
| − | + | =术语表= | |
| + | 请点击这里查看[[Ardour4_初学者教程_07_附录_术语表|术语表]] | ||
| − | + | =链接= | |
| + | [http://brunoruviaro.github.io/ardour4-tutorial/links/ (原文)] | ||
| − | + | 以下是一些有用的链接: | |
| + | *Ardour官方网站: http://ardour.org/ | ||
| + | *Ardour参考手册(编写中): http://manual.ardour.org/ | ||
| + | *Jack音频连接工具箱 http://jackaudio.org/ | ||
| + | *Jack苹果OS X系统版 http://jackosx.com/ | ||
| + | *JAMin开源版 http://jamin.sourceforge.net/ | ||
| + | *教程:精通JAMin和Ardour http://jamin.sourceforge.net/en/tutorial.html | ||
| − | + | =创作者= | |
| + | 请点击这里查看[[Ardour4_初学者教程_07_附录_创作者|创作者]] | ||
| − | + | =如何贡献= | |
| + | [http://brunoruviaro.github.io/ardour4-tutorial/how-to-contribute-0/ (原文)] | ||
| − | + | (注:以下只是关于”如何编写本教程“的帮助信息,与Ardour软件的使用方法关系不大,在此就不详细翻译了。) | |
| − | + | Thanks for your interest in helping improve this tutorial. | |
| − | + | There are many ways to do so, from fixing a small typo to writing whole new sections. In order to make suggestions and propose edits, you will need to create a GitHub account. | |
| − | + | This page explains three ways of contributing to this tutorial: | |
| − | + | *Submitting an issue (easiest) | |
| + | *Editing pages in your browser (easy) | ||
| + | *Advanced editing (pro!) | ||
| − | + | =如何贡献:最简单的方法= | |
| + | [http://brunoruviaro.github.io/ardour4-tutorial/how-to-contribute-1/ (原文)] | ||
| − | + | Thanks for your interest in contributing to this tutorial. | |
| − | The | + | There are many ways to help. The only requirement is you will need to create a GitHub account (it’s free). |
| − | + | ==方法 #1:提交一个议题== | |
| − | + | An issue can be anything: reporting a typo, a mistake, an outdated passage; or making any suggestions for improving the content and structure of the tutorial. This can be done directly through your browser; nothing else is needed. | |
| − | + | *1.Log in to your GitHub account | |
| + | *2.Go to https://github.com/brunoruviaro/ardour4-tutorial | ||
| + | *3.On the right side column, click on “Issues” | ||
| + | *4.Click on the green button “New Issue” | ||
| + | *5.Give it a straightforward title, and describe the issue in details in the comment section. | ||
| − | + | ==提示== | |
| − | + | *Always specify the name of the page (post title) you are referring to. For example, “In the Recording Audio section…” | |
| − | + | *Before submitting a new issue, take a look at existing ones. Perhaps you will find that your idea or suggestion has already been posted by someone else. In this case, feel free to add a comment to that existing thread, instead of opening a duplicate issue. | |
| − | + | *Submitting an issue is the easiest way to contribute: you just post your suggestion or idea and I’ll review and fix the issue as appropriate. | |
| − | + | *If you are willing to learn a little bit more about GitHub, you can go beyond just submitting issues. For example, you could edit the page yourself and propose the change (“pull request”) to be included in the published tutorial (“merge”). Read on Method #2 in the next section if you would like to try. | |
| − | + | =如何贡献:第二简单的方法= | |
| + | [http://brunoruviaro.github.io/ardour4-tutorial/how-to-contribute-2/ (原文)] | ||
| − | + | Thanks for your interest in contributing to this tutorial. | |
| − | + | There are many ways to do so, from fixing a small typo to writing whole new sections. In order to make suggestions and propose edits, you will need to create a GitHub account. | |
| − | + | ==方法 #2:在您的浏览器里编辑== | |
| − | + | A good way of proposing changes (like fixing a typo or a link) is to edit a page directly from the GitHub website. All the tutorial text lives inside the _posts folder in the repository (yes, the one starting with an underline character, not just post). Each page is a separate file ending with the extension .md (stands for “markdown”). | |
| − | + | Simply follow these steps: | |
| − | + | *1. Go to https://github.com/brunoruviaro/ardour4-tutorial/tree/gh-pages/_posts and find the section you want to edit. If this is your first time, you may want to try the file 2014-04-20-dummy-page.md (that page was made just for testing, so no worries of messing it up). | |
| − | + | *2.Click on the file name (2014-04-20-dummy-page.md) to see its content. | |
| − | + | *3.In the header portion of that page, you will see the icon of a little pencil to the right of the button “History”. Click on the pencil icon: littlepencil | |
| − | + | http://brunoruviaro.github.io/ardour4-tutorial/images/GitHub_Pencil.png | |
| − | + | *4.GitHub will show you a message telling you it created a working copy (“fork”) of the tutorial in your own GitHub account, and you will be editing that copy instead. That is all fine. Go to next step. | |
| − | + | *5.You can now edit the raw text for that file. Find the line you want to edit, and type your changes right in. Be careful not to change anything else by mistake. | |
| − | + | *6.Once you are finished, scroll down all the way to the bottom of the page to the “Propose file change” part. propose | |
| − | + | http://brunoruviaro.github.io/ardour4-tutorial/images/GitHub_Propose.png | |
| − | + | *7.Write a short descriptive title (for example, “Fix typo in Dummy Page”), and optionally explain the change in the comment box. | |
| − | + | *8.Click on the green button, “Propose file change”. You will be directed to another page to confirm; we are not done yet. | |
| − | Click | + | *9.In the following page, you will see the change you are proposing, and a green button “Create pull request”. Click on this button to send the proposal to me. You will have another chance to review your title and description of the proposal. Click on “Create pull request” to confirm. |
| − | + | *10.You are done! I will receive the proposal, review it, and merge it to the published tutorial if appropriate. | |
| − | + | =如何贡献:高级方法= | |
| + | [http://brunoruviaro.github.io/ardour4-tutorial/how-to-contribute-3/ (原文)] | ||
| − | + | Thanks for your interest in contributing to this tutorial. | |
| − | + | There are many ways to do so, from fixing a small typo to writing whole new sections. In order to make suggestions and propose edits, you will need to create a GitHub account. | |
| − | + | This page explains the advanced way to contribute. If you would like to try the easier ways, go back here and choose methods 1 or 2. | |
| − | + | ==方法 #3:高级编辑== | |
| − | + | You can do quite a lot of editing and writing directly from your browser using the method described in the previous page. For more extensive contributions, however, the workflow described below if more efficient. You will need to learn a bit of git, GitHub Pages, and jekyll. | |
| − | + | ===衍生分支=== | |
| − | + | A common work flow is to fork the main repository, clone your forked GitHub repository on your computer, make changes locally, preview them with Jekyll, commit and push changes to your online repository, and later create a pull request on GitHub.com. The description below assumes you are minimally comfortable using the command line from a terminal. It also assumes you have successfully installed Jekyll (http://jekyllrb.com/docs/installation/) to preview changes locally. | |
| − | + | *Log in to your GitHub account and go to https://github.com/brunoruviaro/ardour4-tutorial. | |
| − | + | *Fork your own copy of the repository to your account (Click on the Fork button on the upper right corner). You will be directed to your own fork of the tutorial: https://github.com/yourname/ardour4-tutorial. The URL will have your own user name in place of “yourname”. | |
| − | + | *Clone your forked repository on your computer: | |
| − | + | git clone https://github.com/yourname/ardour4-tutorial.git | |
| − | + | ===快速配置在线预览的设置=== | |
| − | + | *Go into the newly cloned directory: | |
| − | + | cd ardour4-tutorial/ | |
| − | + | *Open the file _config.yml with your favorite text editor | |
| − | + | gedit _config.yml | |
| − | + | *Make a simple edit _config.yml: change URL to http://localhost:4000. This change is just to make internal links point to the right places in the live preview. | |
| − | + | *Also inside _config.yml you can change things like the main title of the tutorial, etc (more on this later). | |
| − | + | *Save and close _config.yml. | |
| − | + | *Start Jekyll for a preview of the cloned website: | |
| − | + | jekyll serve --watch | |
| − | + | *Open a browser and go to http://localhost:4000 to see the preview. You can stop the live preview at anytime by going back to the terminal and hitting control + C. | |
| − | + | ===编辑帖子=== | |
| − | + | *Open a post from the _posts folder to make edits. You may also save as from an existing file to start with a template. Save it with same name convention as the others (the earlier the post date, the more to the bottom of Table of Contents). | |
| − | + | *After finishing an edit, make sure the file is saved. | |
| − | + | *At this point you should be able to preview the new page locally, that is, in your browser window. For example, if you make a change to the file 2014-04-19-dummy-page.md and save it, you will be able able to preview it at http://localhost:4000/dummy-page/ | |
| − | + | *Note: when viewing the live preview with jekyll, always make sure your browser points to localhost:4000. For example, the Table of Contents of your live preview should be at: http://localhost:4000/tags/ ; the post 2014-07-23-using-plugins.md should be at http://localhost:4000/using-plugins/ etc. If for any reason your browser is pointing to http://brunoruviaro.github.io/ardour4-tutorial/tags, this means you have been taken out of your local live preview back to the original online site. Simply replace http://brunoruviaro.github.io/ardour4-tutorial/ with http://localhost:4000/ in your browser. | |
| − | + | ===完成编辑?添加,提交,推送=== | |
| − | + | *Finally, after previewing the change and confirming it all looks good, git add and git commit the modified file. For example, after saving a change to the dummy page file, go to the terminal and run these two lines: | |
| − | + | git add 2014-04-19-dummy-page.md | |
| − | + | git commit -m "Fix typo in dummy-page" | |
| − | + | *Now you can push the changes to your online repository: | |
| − | + | git push origin gh-pages | |
| − | + | *You can now go to your GitHub online repository https://github.com/yourname/ardour4-tutorial (“yourname” is your actual user name), and you will see that the changes are reflected there. It is now time to create a pull request, that is, to propose the changes to the published tutorial (Bruno’s repository). | |
| − | + | *Click on “Pull requests” in the right side column, and create a new pull request. Click through the pages to confirm the creation of pull request. | |
| − | + | *The change will be reviewed, discussed if necessary, and incorporated if appropriate. Thanks! | |
| − | + | ==杂项信息== | |
| − | + | This section explains a few things you should know about the structure of a post, how to add images, and other miscellaneous items | |
| − | + | ===帖子保存在哪里=== | |
| − | + | All posts live insider the folder _posts. Take a look at the contents of this folder. | |
| − | + | cd _posts | |
| − | + | ls -lr | |
| − | + | ===GitHub Markdown=== | |
| − | + | This Ardour tutorial is written in Markdown (extension .md), which means there is a specific syntax to indicate titles, formatting, etc. See https://help.github.com/articles/markdown-basics/ to learn more. | |
| − | + | ===帖子时间排序=== | |
| − | + | You’ll notice that all post files start with a date in the format YYYY-MM-DD. The exact dates are arbitrary; they do not reflect post creation date. The only important thing about those dates is their order. The most recent the date in the file name, the topmost in the blog roll that post will be (this also takes care of properly ordering posts in the table of contents). This is why the intro post is called 2014-12-31-introduction.md (the most recent date of all; makes it show up first). If you create a new post and put today’s date in the file name, that post will take its place. | |
| − | + | In short, use dates in file names to ensure posts are ordered in the way you want. Choose any arbitrary past date to place a post at the bottom of the blog roll, or dates in between existing posts to insert a post in between two existing ones. | |
| − | + | ===一个帖子文件中的首要事情=== | |
| − | + | The first thing inside a post file should always be the header: | |
| − | + | --- | |
| + | layout: post | ||
| + | title: “How to Contribute” | ||
| + | description: | ||
| + | comments: false | ||
| + | tags: [07 APPENDICES] | ||
| + | image: | ||
| + | feature: Ardour3_Empty_Session_Transparent.png | ||
| + | credit: | ||
| + | creditlink: | ||
| + | --- | ||
| − | + | You should change the title and the tags field. By convention, the title field and the file name should match. For example, the title above is “How to Contribute”, and the file name is 2014-04-20-how-to-contribute.md. | |
| − | + | The date in the beginning of the file name is used to determine order of posts in the Table of Contents. For example, the post 2014-04-19-dummy-page.md shows up right below 2014-04-20-how-to-contribute.md. | |
| − | The | + | The tags field determines where in the table of contents that page will show up. |
| − | + | The feature is the image background of that particular page. The image should be saved inside the images folder. | |
| − | + | ===页脚=== | |
| − | + | I have included something like this at the end of every post: | |
| − | + | Next: [SAVING A TEMPLATE](../saving-a-template) | |
| − | + | This is helpful to direct the reader to the next post in the tutorial sequence. | |
| − | + | The uppercase word in square brackets is the name of the next section (as shown in the Table of Contents), and the shortcut path in parentheses is the title of the page. Simply change it accordingly on each newly created page. | |
| − | + | If you create a new page that is not necessarily part of a sequence, you may want to write something like “See also” instead of “Next”. Or you might just link back to the Table of Contents. | |
| − | + | ===图像=== | |
| − | + | Images should be saved in the images folder, and linked in the body of the text like this: | |
| − | + |  | |
| − | + | …where the word in square brackets is just a short word describing the image, and Ardour3_Save_Template1.png is the exact file name. Nothing else should be changed. In short, to add a screenshot or image in the text: | |
| − | + | *Copy the png or jpg file to the images folder. Make sure to add and commit to git. | |
| − | + | *Refer to the file in your post using the syntax explained above. | |
| − | + | *Note: Because the {site.url} bit creates an absolute path to the original repository, you won’t be able to see the preview of your new images in Jekyll, unless you temporarily change the url in _config.yml to localhost:4000 and restart Jekyll. | |
| − | + | Further Help with GitHub | |
| − | + | Simple git guide for beginners: http://rogerdudler.github.io/git-guide/ | |
| − | + | Learn more about GitHub Work Flow in the browser: https://github.com/blog/1557-github-flow-in-the-browser | |
| − | + | =如何重新编排= | |
| + | [http://brunoruviaro.github.io/ardour4-tutorial/how-to-remix/ (原文)] | ||
| − | + | Thanks for your interest in remixing this tutorial. | |
| − | + | You can rewrite, add, delete, reorder, basically do whatever you want to the tutorial, and have it automatically published on your GitHub account. | |
| − | + | Basically, you just need to follow the same steps described here, but instead of creating pull requests to merge your changes into the original tutorial, you simply let your tutorial exist by itself, and use your own link to distribute it (on the GitHub online interface, click “Settings” from your repository page, and you will find the link it’s being published to). | |
| − | + | Here’s some additional information on how to customize the tutorial to look like the way you want: | |
| + | ==修改教程的主标题== | ||
| − | + | This is done inside _config.yml. There you can change title, description, estimated reading time, etc. It’s the same file where you change the url (localhost or online website). | |
| − | The | + | The fields “owner name, avatar, bio” in that file define the text and image to be displayed in the “about” pop-up box. |
| − | + | ===关于 _config.yml 文件=== | |
| − | + | Note that _config.yml is in the .gitignore file. This allows you to work locally (with your config file pointing to localhost:4000, but avoid having that change be uploaded to the main online repository). In your online repository, you do want to have the url to point to the actual url of your tutorial. Easiest way is probably to just do a one-time edit of _config.yml directly on GitHub website (put your new title, proper url, etc). Then commit, and clone your repository after that. Make the change to localhost:4000 locally, and work from there. | |
| − | + | ==修改背景图片== | |
| − | + | This is done in the file ardour4-tutorial/index.html. The current default image is Ardour3_Empty_Session_Transparent.png. Replace it with any other file that you have saved inside the images folder. | |
| − | + | To change the background picture of individual posts, open the post file itself (extension .md) and change picture file name in the header. | |
| − | + | ==修改主标题下方的副标题== | |
| − | + | Also inside index.html you can change the subtitle “BEGINNER’S TUTORIAL” that shows up in the main page (it’s the line “title” right below layout: post-index) | |
| − | + | You can now go ahead and remix the tutorial in any way you like. | |
| − | + | ==关于 GitHub 的进一步帮助== | |
| − | + | Simple git guide for beginners: http://rogerdudler.github.io/git-guide/ | |
| − | + | ||
| − | + | ||
| − | + | ||
| − | + | ||
| − | + | ||
| − | + | ||
| − | + | ||
| − | + | ||
| − | + | ||
| − | + | ||
| − | + | ||
| − | + | ||
| − | + | ||
| − | + | ||
| − | + | ||
| − | + | ||
| − | + | ||
| − | + | ||
| − | + | ||
| − | + | ||
| − | + | ||
| − | + | ||
| − | + | ||
| − | + | ||
| − | + | ||
| − | + | ||
| − | + | ||
| − | + | ||
| − | + | ||
| − | + | ||
| − | + | ||
| − | + | ||
| − | + | ||
| − | + | ||
| − | + | ||
| − | + | ||
| − | + | ||
| − | + | ||
| − | + | ||
| − | + | ||
| − | + | ||
| − | + | ||
| − | + | ||
| − | + | ||
| − | + | ||
| − | + | ||
| − | + | ||
| − | + | ||
| − | + | ||
| − | + | ||
| − | + | ||
| − | + | ||
| − | + | ||
| − | + | ||
| − | + | ||
| − | + | ||
| − | + | ||
| − | + | ||
| − | + | ||
| − | + | ||
| − | + | ||
| − | + | ||
| − | + | ||
| − | + | ||
| − | + | ||
| − | + | ||
| − | + | ||
| − | + | ||
| − | + | ||
| − | + | ||
| − | + | ||
| − | + | ||
| − | + | ||
| − | + | ||
| − | + | ||
| − | + | ||
| − | + | ||
| − | + | ||
| − | + | ||
| − | + | ||
| − | + | ||
| − | + | ||
| − | + | ||
| − | + | ||
| − | + | ||
| − | + | ||
| − | + | ||
| − | + | ||
| − | + | ||
| − | + | ||
| − | + | ||
| − | + | ||
| − | + | ||
| − | + | ||
| − | + | ||
| − | + | ||
| − | + | ||
| − | + | ||
| − | + | ||
| − | + | ||
| − | + | ||
| − | + | ||
| − | + | ||
| − | + | ||
| − | + | ||
| − | + | ||
| − | + | ||
| − | + | ||
| − | + | ||
| − | + | ||
| − | + | ||
| − | + | ||
| − | + | ||
| − | + | ||
| − | + | ||
| − | + | ||
| − | + | ||
| − | + | ||
| − | + | ||
| − | + | ||
| − | + | ||
| − | + | ||
| − | + | ||
| − | + | ||
| − | + | ||
| − | + | ||
| − | + | ||
| − | + | ||
| − | + | ||
| − | + | ||
| − | + | ||
| − | + | ||
| − | + | ||
| − | + | ||
| − | + | ||
| − | + | ||
| − | + | ||
| − | + | ||
| − | + | ||
| − | + | ||
| − | + | ||
| − | + | ||
| − | + | ||
| − | + | ||
| − | + | ||
| − | + | ||
| − | + | ||
| − | + | ||
| − | + | ||
| − | + | ||
| − | + | ||
| − | + | ||
| − | + | ||
| − | + | ||
| − | + | ||
| − | + | ||
| − | + | ||
| − | + | ||
| − | + | ||
| − | + | ||
| − | + | ||
| − | + | ||
| − | + | ||
| − | + | ||
| − | + | ||
| − | + | ||
| − | + | ||
| − | + | ||
| − | + | ||
| − | + | ||
| − | + | ||
| − | + | ||
| − | + | ||
| − | + | ||
| − | + | ||
| − | + | ||
| − | + | ||
| − | + | ||
| − | + | ||
| − | + | ||
| − | + | ||
| − | + | ||
| − | + | ||
| − | + | ||
| − | + | ||
| − | + | ||
| − | + | ||
| − | + | ||
| − | + | ||
| − | + | ||
| − | + | ||
| − | + | ||
| − | + | ||
| − | + | ||
| − | + | ||
| − | + | ||
| − | + | ||
| − | + | ||
| − | + | ||
| − | + | ||
| − | + | ||
| − | + | ||
| − | + | ||
| − | + | ||
| − | + | ||
| − | + | ||
| − | + | ||
| − | + | ||
| − | + | ||
| − | + | ||
| − | + | ||
| − | + | ||
| − | + | ||
| − | + | ||
| − | + | ||
| − | + | ||
| − | + | ||
| − | + | ||
| − | + | ||
| − | + | ||
| − | + | ||
| − | + | ||
| − | + | ||
| − | + | ||
| − | + | ||
| − | + | ||
| − | + | ||
| − | + | ||
| − | + | ||
| − | + | ||
| − | + | ||
| − | + | ||
| − | + | ||
| − | + | ||
| − | + | ||
| − | + | ||
| − | + | ||
| − | + | ||
| − | + | ||
| − | + | ||
| − | + | ||
| − | + | ||
| − | + | ||
| − | + | ||
| − | + | ||
| − | + | ||
| − | + | ||
| − | + | ||
| − | + | ||
| − | + | ||
| − | + | ||
| − | + | ||
| − | + | ||
| − | + | ||
| − | + | ||
| − | + | ||
| − | + | ||
| − | + | ||
| − | + | ||
| − | + | ||
| − | + | ||
| − | + | ||
| − | + | ||
| − | + | ||
| − | + | ||
| − | + | ||
| − | + | ||
| − | + | ||
| − | + | ||
| − | + | ||
| − | + | ||
| − | + | ||
| − | + | ||
| − | + | ||
| − | + | ||
| − | + | ||
| − | + | ||
| − | + | ||
| − | + | ||
| − | + | ||
| − | + | ||
| − | + | ||
| − | + | ||
| − | + | ||
| − | + | ||
| − | + | ||
| − | + | ||
| − | + | ||
| − | + | ||
| − | + | ||
| − | + | ||
| − | + | ||
| − | + | ||
| − | + | ||
| − | + | ||
| − | + | ||
| − | + | ||
| − | + | ||
| − | + | ||
| − | + | ||
| − | + | ||
| − | + | ||
| − | + | ||
| − | + | ||
| − | + | ||
| − | + | ||
| − | + | ||
| − | + | ||
| − | + | ||
| − | + | ||
| − | + | ||
| − | + | ||
| − | + | ||
| − | + | ||
| − | + | ||
| − | |||
| − | |||
=<center>— [[Ardour完全教程|返回主目录]] —</center>= | =<center>— [[Ardour完全教程|返回主目录]] —</center>= | ||
2016年2月26日 (五) 18:45的最新版本
进一步的帮助
除了在链接章中列出的网址,还有一些在互联网上的资源可以帮助您学习Ardour,以及帮助您修复一些有可能遇到的问题。
Ardour手册
官方的Ardour手册是主要的Ardour参考书,它目前仍在编写中,这意味着您(还)不能找到每一个功能的解释。但它已经是一个很了不起的资源:
通过聊天软件得到帮助
在学习Ardour和使用Ardour工作时,有一个获得技术支持的好方法,就是使用“聊天Chat”功能。Ardour内置有一个“聊天”选项,可以在主菜单下找到“帮助Help > 聊天Chat”,然后(通过您的网页浏览器)连接到位于Freenode网站上的Ardour IRC频道。
您也可以使用你具备有IRC功能的聊天应用程序(例如Pidgin或者Xchat)连接到在Freenode网站上的Ardour频道(#ardour或者#ardour-osx),或者直接使用这个连接:
http://webchat.freenode.net/?channels=ardour
输入昵称然后连接,欢迎您!
在这样一个IRC聊天频道或房间,您可以找到热情开发人员和其他用户,一起讨论Ardour的使用、您遇到的问题和/或故障,或者您想讨论的关于Ardour的建议 。
通过电子邮件列表得到帮助
对于那些宁愿使用电子邮件列表而不是IRC聊天的朋友,Ardour用户电子邮件列表也是一个好地方,用户和开发者可以讨论任何关于使用Ardour的问题和想法。这是一个活跃的列表,有许多乐于助人的且知识渊博的用户来帮助指导经验较少的人。有时有更常见的讨论话题会类似如:记录技术、音频接口的选择等。
http://lists.ardour.org/listinfo.cgi/ardour-users-ardour.org
Ardour 相关网站
术语表
请点击这里查看术语表
链接
以下是一些有用的链接:
- Ardour官方网站: http://ardour.org/
- Ardour参考手册(编写中): http://manual.ardour.org/
- Jack音频连接工具箱 http://jackaudio.org/
- Jack苹果OS X系统版 http://jackosx.com/
- JAMin开源版 http://jamin.sourceforge.net/
- 教程:精通JAMin和Ardour http://jamin.sourceforge.net/en/tutorial.html
创作者
请点击这里查看创作者
如何贡献
(注:以下只是关于”如何编写本教程“的帮助信息,与Ardour软件的使用方法关系不大,在此就不详细翻译了。)
Thanks for your interest in helping improve this tutorial.
There are many ways to do so, from fixing a small typo to writing whole new sections. In order to make suggestions and propose edits, you will need to create a GitHub account.
This page explains three ways of contributing to this tutorial:
- Submitting an issue (easiest)
- Editing pages in your browser (easy)
- Advanced editing (pro!)
如何贡献:最简单的方法
Thanks for your interest in contributing to this tutorial.
There are many ways to help. The only requirement is you will need to create a GitHub account (it’s free).
方法 #1:提交一个议题
An issue can be anything: reporting a typo, a mistake, an outdated passage; or making any suggestions for improving the content and structure of the tutorial. This can be done directly through your browser; nothing else is needed.
- 1.Log in to your GitHub account
- 2.Go to https://github.com/brunoruviaro/ardour4-tutorial
- 3.On the right side column, click on “Issues”
- 4.Click on the green button “New Issue”
- 5.Give it a straightforward title, and describe the issue in details in the comment section.
提示
- Always specify the name of the page (post title) you are referring to. For example, “In the Recording Audio section…”
- Before submitting a new issue, take a look at existing ones. Perhaps you will find that your idea or suggestion has already been posted by someone else. In this case, feel free to add a comment to that existing thread, instead of opening a duplicate issue.
- Submitting an issue is the easiest way to contribute: you just post your suggestion or idea and I’ll review and fix the issue as appropriate.
- If you are willing to learn a little bit more about GitHub, you can go beyond just submitting issues. For example, you could edit the page yourself and propose the change (“pull request”) to be included in the published tutorial (“merge”). Read on Method #2 in the next section if you would like to try.
如何贡献:第二简单的方法
Thanks for your interest in contributing to this tutorial.
There are many ways to do so, from fixing a small typo to writing whole new sections. In order to make suggestions and propose edits, you will need to create a GitHub account.
方法 #2:在您的浏览器里编辑
A good way of proposing changes (like fixing a typo or a link) is to edit a page directly from the GitHub website. All the tutorial text lives inside the _posts folder in the repository (yes, the one starting with an underline character, not just post). Each page is a separate file ending with the extension .md (stands for “markdown”).
Simply follow these steps:
- 1. Go to https://github.com/brunoruviaro/ardour4-tutorial/tree/gh-pages/_posts and find the section you want to edit. If this is your first time, you may want to try the file 2014-04-20-dummy-page.md (that page was made just for testing, so no worries of messing it up).
- 2.Click on the file name (2014-04-20-dummy-page.md) to see its content.
- 3.In the header portion of that page, you will see the icon of a little pencil to the right of the button “History”. Click on the pencil icon: littlepencil
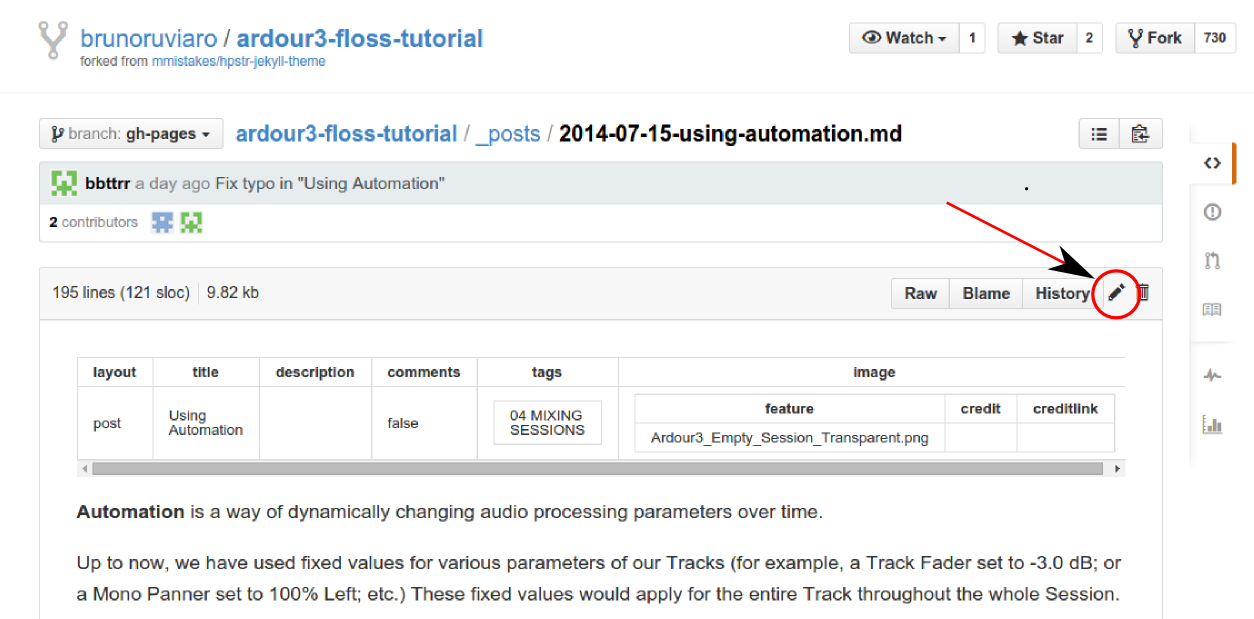
- 4.GitHub will show you a message telling you it created a working copy (“fork”) of the tutorial in your own GitHub account, and you will be editing that copy instead. That is all fine. Go to next step.
- 5.You can now edit the raw text for that file. Find the line you want to edit, and type your changes right in. Be careful not to change anything else by mistake.
- 6.Once you are finished, scroll down all the way to the bottom of the page to the “Propose file change” part. propose
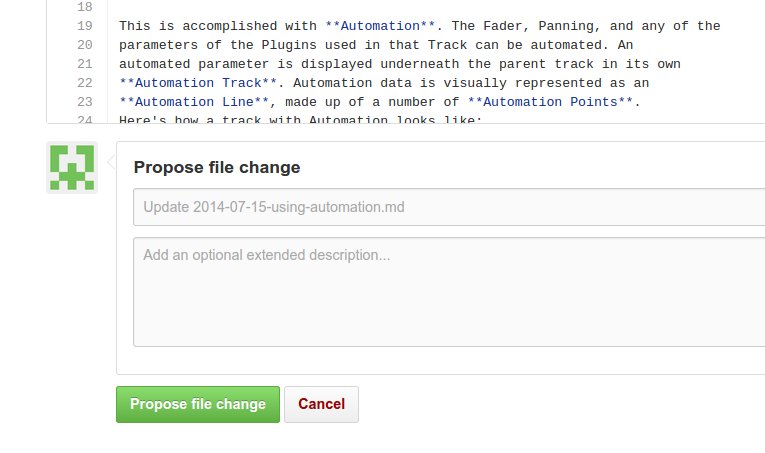
- 7.Write a short descriptive title (for example, “Fix typo in Dummy Page”), and optionally explain the change in the comment box.
- 8.Click on the green button, “Propose file change”. You will be directed to another page to confirm; we are not done yet.
- 9.In the following page, you will see the change you are proposing, and a green button “Create pull request”. Click on this button to send the proposal to me. You will have another chance to review your title and description of the proposal. Click on “Create pull request” to confirm.
- 10.You are done! I will receive the proposal, review it, and merge it to the published tutorial if appropriate.
如何贡献:高级方法
Thanks for your interest in contributing to this tutorial.
There are many ways to do so, from fixing a small typo to writing whole new sections. In order to make suggestions and propose edits, you will need to create a GitHub account.
This page explains the advanced way to contribute. If you would like to try the easier ways, go back here and choose methods 1 or 2.
方法 #3:高级编辑
You can do quite a lot of editing and writing directly from your browser using the method described in the previous page. For more extensive contributions, however, the workflow described below if more efficient. You will need to learn a bit of git, GitHub Pages, and jekyll.
衍生分支
A common work flow is to fork the main repository, clone your forked GitHub repository on your computer, make changes locally, preview them with Jekyll, commit and push changes to your online repository, and later create a pull request on GitHub.com. The description below assumes you are minimally comfortable using the command line from a terminal. It also assumes you have successfully installed Jekyll (http://jekyllrb.com/docs/installation/) to preview changes locally.
- Log in to your GitHub account and go to https://github.com/brunoruviaro/ardour4-tutorial.
- Fork your own copy of the repository to your account (Click on the Fork button on the upper right corner). You will be directed to your own fork of the tutorial: https://github.com/yourname/ardour4-tutorial. The URL will have your own user name in place of “yourname”.
- Clone your forked repository on your computer:
git clone https://github.com/yourname/ardour4-tutorial.git
快速配置在线预览的设置
- Go into the newly cloned directory:
cd ardour4-tutorial/
- Open the file _config.yml with your favorite text editor
gedit _config.yml
- Make a simple edit _config.yml: change URL to http://localhost:4000. This change is just to make internal links point to the right places in the live preview.
- Also inside _config.yml you can change things like the main title of the tutorial, etc (more on this later).
- Save and close _config.yml.
- Start Jekyll for a preview of the cloned website:
jekyll serve --watch
- Open a browser and go to http://localhost:4000 to see the preview. You can stop the live preview at anytime by going back to the terminal and hitting control + C.
编辑帖子
- Open a post from the _posts folder to make edits. You may also save as from an existing file to start with a template. Save it with same name convention as the others (the earlier the post date, the more to the bottom of Table of Contents).
- After finishing an edit, make sure the file is saved.
- At this point you should be able to preview the new page locally, that is, in your browser window. For example, if you make a change to the file 2014-04-19-dummy-page.md and save it, you will be able able to preview it at http://localhost:4000/dummy-page/
- Note: when viewing the live preview with jekyll, always make sure your browser points to localhost:4000. For example, the Table of Contents of your live preview should be at: http://localhost:4000/tags/ ; the post 2014-07-23-using-plugins.md should be at http://localhost:4000/using-plugins/ etc. If for any reason your browser is pointing to http://brunoruviaro.github.io/ardour4-tutorial/tags, this means you have been taken out of your local live preview back to the original online site. Simply replace http://brunoruviaro.github.io/ardour4-tutorial/ with http://localhost:4000/ in your browser.
完成编辑?添加,提交,推送
- Finally, after previewing the change and confirming it all looks good, git add and git commit the modified file. For example, after saving a change to the dummy page file, go to the terminal and run these two lines:
git add 2014-04-19-dummy-page.md
git commit -m "Fix typo in dummy-page"
- Now you can push the changes to your online repository:
git push origin gh-pages
- You can now go to your GitHub online repository https://github.com/yourname/ardour4-tutorial (“yourname” is your actual user name), and you will see that the changes are reflected there. It is now time to create a pull request, that is, to propose the changes to the published tutorial (Bruno’s repository).
- Click on “Pull requests” in the right side column, and create a new pull request. Click through the pages to confirm the creation of pull request.
- The change will be reviewed, discussed if necessary, and incorporated if appropriate. Thanks!
杂项信息
This section explains a few things you should know about the structure of a post, how to add images, and other miscellaneous items
帖子保存在哪里
All posts live insider the folder _posts. Take a look at the contents of this folder.
cd _posts
ls -lr
GitHub Markdown
This Ardour tutorial is written in Markdown (extension .md), which means there is a specific syntax to indicate titles, formatting, etc. See https://help.github.com/articles/markdown-basics/ to learn more.
帖子时间排序
You’ll notice that all post files start with a date in the format YYYY-MM-DD. The exact dates are arbitrary; they do not reflect post creation date. The only important thing about those dates is their order. The most recent the date in the file name, the topmost in the blog roll that post will be (this also takes care of properly ordering posts in the table of contents). This is why the intro post is called 2014-12-31-introduction.md (the most recent date of all; makes it show up first). If you create a new post and put today’s date in the file name, that post will take its place.
In short, use dates in file names to ensure posts are ordered in the way you want. Choose any arbitrary past date to place a post at the bottom of the blog roll, or dates in between existing posts to insert a post in between two existing ones.
一个帖子文件中的首要事情
The first thing inside a post file should always be the header:
--- layout: post title: “How to Contribute” description: comments: false tags: [07 APPENDICES] image: feature: Ardour3_Empty_Session_Transparent.png credit: creditlink: ---
You should change the title and the tags field. By convention, the title field and the file name should match. For example, the title above is “How to Contribute”, and the file name is 2014-04-20-how-to-contribute.md.
The date in the beginning of the file name is used to determine order of posts in the Table of Contents. For example, the post 2014-04-19-dummy-page.md shows up right below 2014-04-20-how-to-contribute.md.
The tags field determines where in the table of contents that page will show up.
The feature is the image background of that particular page. The image should be saved inside the images folder.
页脚
I have included something like this at the end of every post:
Next: [SAVING A TEMPLATE](../saving-a-template)
This is helpful to direct the reader to the next post in the tutorial sequence.
The uppercase word in square brackets is the name of the next section (as shown in the Table of Contents), and the shortcut path in parentheses is the title of the page. Simply change it accordingly on each newly created page.
If you create a new page that is not necessarily part of a sequence, you may want to write something like “See also” instead of “Next”. Or you might just link back to the Table of Contents.
图像
Images should be saved in the images folder, and linked in the body of the text like this:

…where the word in square brackets is just a short word describing the image, and Ardour3_Save_Template1.png is the exact file name. Nothing else should be changed. In short, to add a screenshot or image in the text:
- Copy the png or jpg file to the images folder. Make sure to add and commit to git.
- Refer to the file in your post using the syntax explained above.
- Note: Because the {site.url} bit creates an absolute path to the original repository, you won’t be able to see the preview of your new images in Jekyll, unless you temporarily change the url in _config.yml to localhost:4000 and restart Jekyll.
Further Help with GitHub
Simple git guide for beginners: http://rogerdudler.github.io/git-guide/
Learn more about GitHub Work Flow in the browser: https://github.com/blog/1557-github-flow-in-the-browser
如何重新编排
Thanks for your interest in remixing this tutorial.
You can rewrite, add, delete, reorder, basically do whatever you want to the tutorial, and have it automatically published on your GitHub account.
Basically, you just need to follow the same steps described here, but instead of creating pull requests to merge your changes into the original tutorial, you simply let your tutorial exist by itself, and use your own link to distribute it (on the GitHub online interface, click “Settings” from your repository page, and you will find the link it’s being published to).
Here’s some additional information on how to customize the tutorial to look like the way you want:
修改教程的主标题
This is done inside _config.yml. There you can change title, description, estimated reading time, etc. It’s the same file where you change the url (localhost or online website).
The fields “owner name, avatar, bio” in that file define the text and image to be displayed in the “about” pop-up box.
关于 _config.yml 文件
Note that _config.yml is in the .gitignore file. This allows you to work locally (with your config file pointing to localhost:4000, but avoid having that change be uploaded to the main online repository). In your online repository, you do want to have the url to point to the actual url of your tutorial. Easiest way is probably to just do a one-time edit of _config.yml directly on GitHub website (put your new title, proper url, etc). Then commit, and clone your repository after that. Make the change to localhost:4000 locally, and work from there.
修改背景图片
This is done in the file ardour4-tutorial/index.html. The current default image is Ardour3_Empty_Session_Transparent.png. Replace it with any other file that you have saved inside the images folder.
To change the background picture of individual posts, open the post file itself (extension .md) and change picture file name in the header.
修改主标题下方的副标题
Also inside index.html you can change the subtitle “BEGINNER’S TUTORIAL” that shows up in the main page (it’s the line “title” right below layout: post-index)
You can now go ahead and remix the tutorial in any way you like.
关于 GitHub 的进一步帮助
Simple git guide for beginners: http://rogerdudler.github.io/git-guide/